Page 179 - Clinical relevance of current materials for cranial implants
P. 179
                                 Effects of sterilization on the mechanical properties of PMMA
All specimens were wet grinded with standard metallographic grinding paper (P500, P1000 and P1200) and visually inspected for a smooth surface without porosities and irregularities. Sterilization was performed seven to ten days post-polymerization and the specimens were stored at least 72 hours under standard laboratory climate conditions (22 ± 1°C and 50 ± 2% humidity).
Flexural strength and flexural modulus
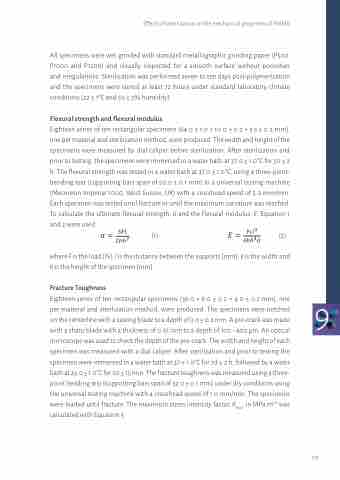
Eighteen series of ten rectangular specimens (64.0 ± 1.0 × 10.0 ± 0.2 × 3.3 ± 0.2 mm), one per material and sterilization method, were produced. The width and height of the specimens were measured by dial caliper before sterilization. After sterilization and prior to testing, the specimens were immersed in a water bath at 37.0 ± 1.0°C for 50 ± 2 h. The flexural strength was tested in a water bath at 37.0 ± 1.0°C, using a three-point- bending test (supporting bars span of 50.0 ± 0.1 mm) in a universal testing machine (Mecmesin Imperial 1000, West Sussex, UK) with a crosshead speed of 5.0 mm/min. Each specimen was tested until fracture or until the maximum curvature was reached. To calculate the ultimate flexural strength, σ and the flexural modulus, E, Equation 1 and 2 were used.
(1) (2) where F is the load [N], l is the distance between the supports [mm], b is the width and
h is the height of the specimen [mm].
Fracture Toughness
Eighteen series of ten rectangular specimens (39.0 × 8.0 ± 0.2 × 4.0 ± 0.2 mm), one 9 per material and sterilization method, were produced. The specimens were notched
on the centerline with a sawing blade to a depth of 3.0 ± 0.2 mm. A pre-crack was made
with a sharp blade with a thickness of 0.55 mm to a depth of 100 - 400 μm. An optical
microscope was used to check the depth of the pre-crack. The width and height of each specimen was measured with a dial caliper. After sterilization and prior to testing the specimen were immersed in a water bath at 37 ± 1.0°C for 7d ± 2 h, followed by a water bath at 23.0 ± 1.0°C for 60 ± 15 min. The fracture toughness was measured using a three- point bending test (supporting bars span of 32.0 ± 0.1 mm) under dry conditions using the universal testing machine with a crosshead speed of 1.0 mm/min. The specimens were loaded until fracture. The maximum stress intensity factor, Kmax, in MPa m1/2 was calculated with Equation 3.
                      177


